
What Homeowners Pay for a Pressure Reducing Valve: $280–$920
Updated: Sep 20
Replacing a residential pressure reducing valve typically costs between a few hundred dollars, with most homeowners landing near a $475 average once labor, parts, and basic fittings are included. Straightforward swaps with easy access run toward the low end, while jobs on a 1" line, corroded piping, or after-hours emergency calls can push the total to $800 or beyond.
TL;DR:
Most homeowners pay around $475 for a straightforward pressure reducing valve replacement, but costs can exceed $800 if piping is corroded or installation is complex.
Valve prices vary from $50 to $250 for most residential ¾" models, with larger or pilot-operated valves costing more due to increased size and technical complexity.
Labor accounts for the largest portion of the cost, typically 2 to 4 hours at rates between $75 and $150 per hour, especially on installations with difficult access or deteriorated piping.
Additional expenses from permits, fittings, or repairs for corroded piping can add $50 to $400 to the total, making unexpected issues the main drivers of higher costs.
DIY installation is risky, as improper fitting or leaks behind walls can cause significant water damage, often making professional replacement the safer and more cost-effective choice.
Table of Contents
What Does a Pressure Reducing Valve Cost, Line by Line?
A quote for a pressure reducing valve isn’t one number. It’s four separate costs stacked together: the valve itself, labor, fittings and small parts, and sometimes a permit or test fee. Knowing what belongs in each bucket is how you tell a fair estimate from an inflated one.
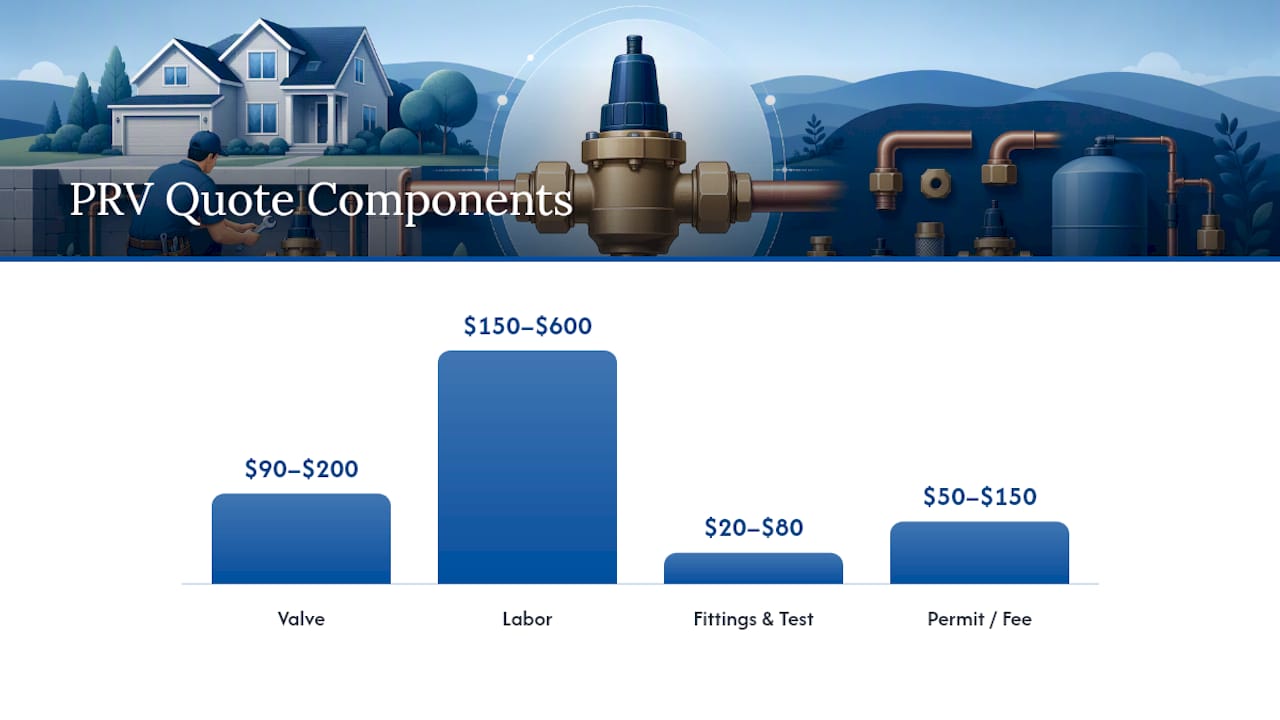
Valve unit pricing depends heavily on size and type. A standard ¾" direct-acting PRV, the kind found in most single-family homes, typically runs $50 to $250 at supply houses depending on brand and build quality. Retail utility guidance puts the range a bit tighter, around $90 to $200 for a comparable homeowner-grade valve. Step up to a 1" valve for a larger home or higher-flow fixtures, and expect to pay more for both the part and the extra labor to fit larger pipe. Pilot-operated valves, used mainly in commercial or high-demand residential setups, cost noticeably more than direct-acting models because they hold pressure more precisely under fluctuating flow.
Labor is usually the biggest line item after the valve itself. Most straightforward swaps take 2 to 4 hours, and hourly plumbing labor rates vary by region, generally landing somewhere between $75 and $150 an hour. Multiply hours by rate, add the valve, and you’re most of the way to your total.
Fittings and testing round out the invoice. Unions, a new pressure gauge, thread sealant, and a post-install pressure test typically add $20 to $80. Some municipalities require a permit or inspection for water-supply work, adding another $50 to $150 depending on your local code office.
Here’s how that breaks down in two real-world scenarios:
Scenario A: Straight swap, good access. Existing PRV in a basement or utility closet, no corrosion, ¾" line. Valve ($90) + labor at 2 hours ($150 to $300) + fittings/test ($40) = roughly $280 to $430, consistent with the $532 to $636 baseline many contractor estimates use once markup and dispatch fees are added.
Scenario B: Swap with piping work. Same valve, but the old union is corroded and a section of galvanized pipe needs replacing. Valve ($120) + labor at 4 hours ($300 to $600) + extra pipe and fittings ($100 to $200) = $520 to $920, which lines up with the higher end of national installed-cost ranges for jobs that uncover additional repairs.
The gap between those two scenarios is the whole story of pressure reducing valve cost. The valve rarely breaks the budget. What breaks it is everything around the valve.
What Makes a PRV Installation More Expensive?
Three things drive almost every price swing you’ll see between quotes: what’s being replaced, what’s around it, and who’s doing the work.
Valve size and type set the floor. A ¾" direct-acting valve is the cheapest and fastest to install. Jump to 1" or larger, or specify a pilot-operated valve for tighter pressure control, and both the part price and the labor time climb, since larger fittings require more careful thread work to avoid leaks.
Access and pipe condition are where estimates go sideways. A PRV sitting in an open utility room takes a fraction of the time of one buried behind a finished wall, wedged in a crawlspace, or bolted to a corroded galvanized line that crumbles the moment a wrench touches it.
Finished wall access: often adds $100 to $300 for cutting and patching drywall.
Crawlspace or tight mechanical closet: adds time and sometimes a second technician, roughly $75 to $200 extra.
Corroded or brittle piping nearby: frequently uncovers pinhole leaks or failing unions once the old valve comes off, adding $150 to $400 in unplanned repair.
Permits, region, and timing matter more than most homeowners expect. Some cities require a permit for supply-line work, typically $50 to $150.
Pro Tip: If your technician quotes a number well above $650 for what sounds like a routine swap, ask specifically what’s driving the difference: valve size, piping condition, or access. A legitimate answer will point to one of those three factors, not a vague “it’s just a harder job.”
Should You Replace a Pressure Reducing Valve Yourself?
A capable DIYer with the right tools can replace a PRV. Whether that’s a good idea depends on what you’re risking if it goes wrong.
Shut off the main water supply and drain the line completely before removing the old valve.
Cut or unscrew the old valve, clean the pipe threads, and check for corrosion on both sides of the union.
Install the new valve in the correct orientation (an arrow on the body shows flow direction), using fresh thread sealant on every joint.
Restore water slowly, check every joint for leaks, then set the valve to the target pressure and confirm with a gauge.
The failure modes are where DIY gets expensive. Cross-threaded fittings, a valve installed backward, or a joint that leaks slowly behind a wall can turn a $150 part into a $2,000 water-damage claim. Utility guidance across the country treats the PRV as homeowner responsibility, which means there’s usually no one else to call once it fails, but that same responsibility is exactly why a botched DIY repair falls entirely on you. A working plumber’s honest take: the part is cheap, but a leaking joint behind drywall is not, and that risk calculation is what pushes most homeowners toward a licensed technician even when the job itself looks simple. If your home has old galvanized piping, a finished wall between you and the valve, or you’re not confident diagnosing a leak before it becomes a burst pipe, call a professional.
How Can You Lower Your Pressure Regulator Installation Cost?
You can trim the bill without cutting corners on the parts that actually protect your home.
Bundle the job. Pairing a PRV swap with another plumbing task, like a water heater replacement, often reduces total labor cost because setup and access work overlap.
Choose a mid-range valve. The cheapest valve on the shelf often fails sooner, while a mid-tier model costs $20 to $40 more but typically lasts years longer, lowering your real cost per year of service.
Get an itemized quote before work starts. Ask for the valve price, labor hours, and any permit fee broken out separately, not bundled into one number you can’t audit.
Schedule outside emergency hours. A planned appointment during regular business hours avoids the after-hours premium that comes with a failed valve at 9 p.m. on a Saturday.
A maintenance membership that includes periodic plumbing inspections can also catch a failing valve before it becomes an emergency call, which is where the real savings usually happen.
Pro Tip: Ask your plumber directly, “What would make this job cost more once you’re inside the wall?” A contractor who can answer specifically is one who’s done this job enough times to know where the surprises hide.
How Long Does a Pressure Reducing Valve Last?
Most residential PRVs last several years before internal parts wear enough to cause pressure creep or failure. Signs of a dying valve include fluctuating water pressure, banging pipes, or a pressure reading that climbs over time even after adjustment.
Check your home’s pressure once a year with a simple threaded water pressure gauge attached to an outdoor spigot; utility guidance recommends this as standard homeowner maintenance.
A healthy reading sits between 40 and 60 PSI. Anything consistently above 80 PSI means the regulator likely isn’t doing its job.
Minor adjustment of the regulating screw can sometimes correct a slightly high reading, but a valve that won’t hold a stable pressure after adjustment needs replacing, not repairing.
Water running above 80 PSI for extended periods accelerates wear on water heaters, washing machine hoses, and faucet cartridges, turning one small failure into several expensive ones.
How Do You Know When Replacement Beats Repair?
Some symptoms point straight to replacement rather than a quick fix.
Pressure that swings noticeably throughout the day, even after adjustment
Visible corrosion, mineral buildup, or a valve body that’s cracked or weeping
Repeated leaks at the same joint despite reseating fittings
Before accepting a replacement recommendation, ask for a before-and-after pressure reading and to see the old parts pulled from the wall. A technician who documents both is giving you real proof, not a sales pitch. As a rule, if the valve is over 10 years old and showing any of the symptoms above, replacement is almost always more cost-effective than another repair attempt, since parts for older valve models get harder to source and repairs rarely hold for long on a worn regulating mechanism.
How Texas Comfort Crew Prices PRV Replacements Honestly
Author Dan Patino and the Texas Comfort Crew team built their pricing approach around one rule: repair before replace, and never guess when you can measure. Every plumbing visit starts with an actual pressure reading, not an assumption, because that number decides whether a valve needs adjustment, repair, or full replacement.
Diagnostic visits include a pressure check and a visual inspection of the valve, unions, and nearby piping.
Estimates are itemized by line item: valve, labor hours, fittings, and any permit fee, before work begins.
Invoices spell out exactly what was replaced and why, matching the repair-first philosophy applied across HVAC and plumbing work.
Homeowners dealing with fluctuating pressure can also check the low water pressure guide for early warning signs before calling for a full inspection.
A Technician’s Checklist: What We Look At Before Quoting Your Job
Every PRV call starts the same way: check the meter, find the main shutoff, and take a pressure reading before touching anything. From there, we inspect pipe material near the valve, since galvanized or heavily corroded fittings almost always mean more labor than the valve swap alone.
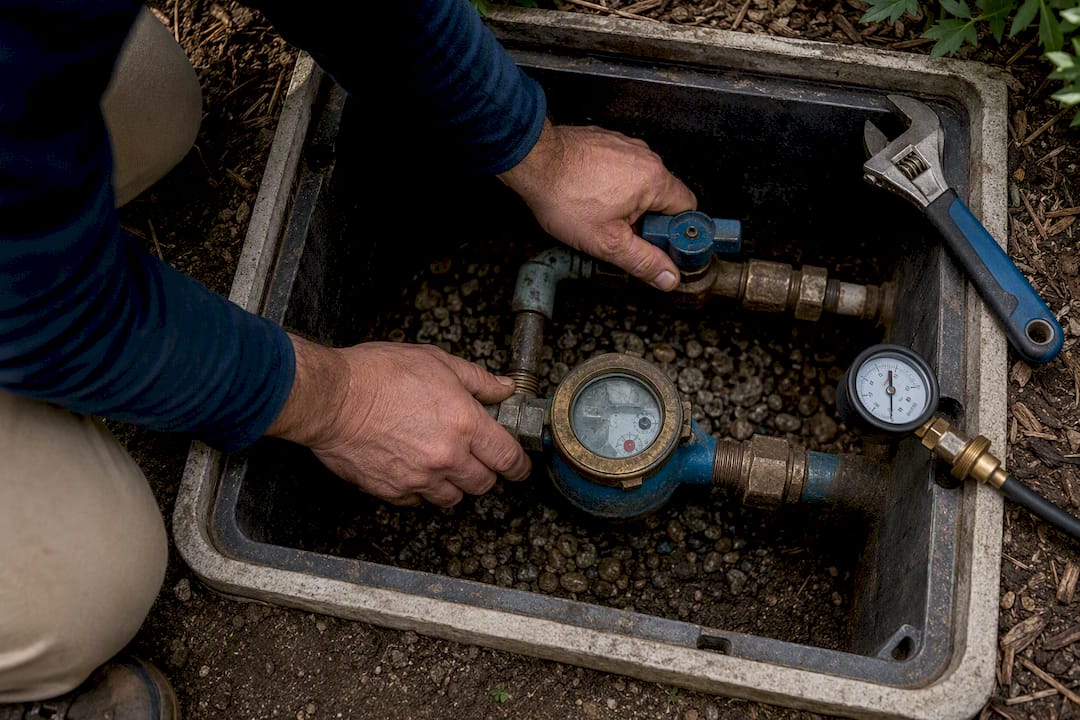
Extra labor or parts only get added when we can show you why, usually with a photo of corrosion or a second pressure reading proving the old valve isn’t holding. Homes on well water tend to see wider pressure swings than those on municipal lines, since well systems lack the buffering effect that city water pressure regulation provides upstream.
Ask any technician for the before-and-after pressure numbers and to see the old valve before it goes in the truck. That’s the fastest way to confirm the price matches the actual job.
— Dan Patino
Get an Honest Estimate for Your Pressure Reducing Valve
Pricing for PRV replacements is itemized, explained, and does not include unnecessary work. A typical visit includes a pressure test, a visual check of the valve and nearby piping, and a written estimate that breaks out the valve, labor, and any fittings before work begins.

If the diagnosis reveals bigger issues, such as corroded piping behind the valve, the technician will show the findings and the cost to fix, with no surprise line items after the fact. That’s true whether the job is a simple ¾" swap or turns into something closer to a foundation-level plumbing repair. Homeowners in the Borene service area and across the region we serve can request a written estimate directly through our plumbing services page. Reach out, describe what you’re seeing (pressure swings, banging pipes, a valve that’s over a decade old), and we’ll get a technician out to measure the actual problem before quoting a single dollar.
Sources
FAQ
How Much Should It Cost to Install a Pressure Reducing Valve?
A typical residential installation runs between a few hundred dollars total, including the valve, labor, and basic fittings, with a national average near $475.
How Much Does It Cost to Replace a Pressure Reduction Valve?
Replacement costs match new installation in most cases, generally between a few hundred dollars, though jobs involving corroded piping or a 1" line can run $800 or more once extra labor and parts are added.
What Is the Typical Lifespan of a Water Pressure Reducing Valve?
Most residential PRVs last several years before internal parts wear enough to cause pressure creep or failure, though annual checks with a pressure gauge can catch problems before they force an emergency replacement.
Do I Really Need a Pressure Reducing Valve?
If your incoming water pressure runs above 80 PSI, yes. A PRV protects water heaters, appliances, and fixtures from premature wear, and most utilities treat it as required homeowner equipment rather than an optional upgrade.
Recommended
Comments